


How to Fix iPhone Could Not Be Restored Error 9?
Restoring an iPhone through iTunes or Finder is usually a straightforward process. However, many users encounter the message “The iPhone could not be restored. An unknown error occurred (9)” during a restore or update. This error can interrupt the restoration process, leave the device stuck in recovery mode, and prevent users from accessing their iPhone normally.
iPhone Error 9 is one of the more common restore-related errors reported by Apple users. While it can be frustrating, the good news is that it is often fixable with a few troubleshooting steps. In this guide, we’ll explain what iPhone Error 9 means, why it occurs, and the most effective methods to resolve it.
1. What Does iPhone Error 9 Mean?
iPhone Error 9 is a restore or update error that occurs when communication between your iPhone and computer is interrupted during the process. When this happens, iTunes or Finder cannot complete the restore, resulting in the message:
“The iPhone could not be restored. An unknown error occurred (9).”
In addition to connection problems, Error 9 can sometimes be caused by iOS corruption or hardware-related issues, leaving the device stuck in Recovery Mode, on a black screen, or trapped in a restart loop.
2. Why Does iPhone Could Not Be Restored Error 9 Occur?
Several factors can trigger Error 9 during an iPhone restore. Common causes include:
- Faulty or damaged USB cable
- Loose USB connection
- Outdated version of iTunes or macOS
- USB port problems
- Security software interfering with the restore process
- Corrupted iOS firmware
- Interrupted software updates
- System glitches on the iPhone
- Hardware-related issues (such as damaged connectors or logic board components)
Identifying the root cause can help determine the most effective solution.
3. How to Fix iPhone Could Not Be Restored Error 9?
Below are several proven methods to resolve iPhone Error 9.
Fix 1: Check the USB Cable and Connection
A faulty or unstable connection between your iPhone and computer can trigger Error 9. Make sure you’re using an original Apple cable, check for any cable damage, connect directly to the computer instead of a USB hub, and try a different USB port if needed. After reconnecting your device, attempt the restore again.
Fix 2: Update iTunes or macOS
An outdated version of iTunes or Finder may cause compatibility issues during restoration.
For Windows:
- Open iTunes > Click Help > Check for Updates > Installa qualsiasi aghjurnamenti dispunibili.
Per Mac:
- Apertu System Settings > Andà à General > Software Update > Install the latest macOS updates.
Once updated, reconnect your iPhone and try restoring it again.
Fix 3: Restart Both iPhone and Computer
Temporary glitches can sometimes cause Error 9. Simply restart both your iPhone and computer, then reconnect the device and try the restore again.
Fix 4: Disable Security Software Temporarily
Antivirus programs, firewalls, and security applications can occasionally interrupt the restore process.
To test whether security software is causing Error 9:
- Temporarily disable your antivirus or firewall.
- Open iTunes or Finder, then attempt the restore again.
If the restore succeeds, consider adding iTunes or Finder to your security software’s exception list before re-enabling protection.
Fix 5: Put the iPhone into Recovery Mode
If a normal restore doesn’t work, you can use Recovery Mode to reinstall iOS.
Once in Recovery Mode, connect your iPhone to your computer and open iTunes or Finder. When prompted, select Actualizazione to reinstall iOS without erasing data. If the update fails, choose Risturà to perform a complete device restoration.
Fix 6: Use DFU Mode Restore
Device Firmware Update (DFU) Mode performs a deeper restoration than Recovery Mode and can help fix severe software corruption.
To use DFU Mode:
- Connect your iPhone to the computer.
- Enter DFU Mode according to your device model.
- Open iTunes or Finder, restore the device when prompted.
Keep in mind that DFU restores erase all data on the device, so this method should generally be used after other solutions have failed.
Fix 7: Try Another Computer
Error 9 may be caused by software or driver issues on your computer. Try restoring your iPhone on another PC, Mac, or user account to determine whether the problem is computer-related.
Fix 8: Check for Hardware Problems
If Error 9 continues after all software fixes, the issue may be hardware-related, such as a damaged charging port, water damage, or internal component failure. Consider having your iPhone inspected by Apple or a qualified repair technician.
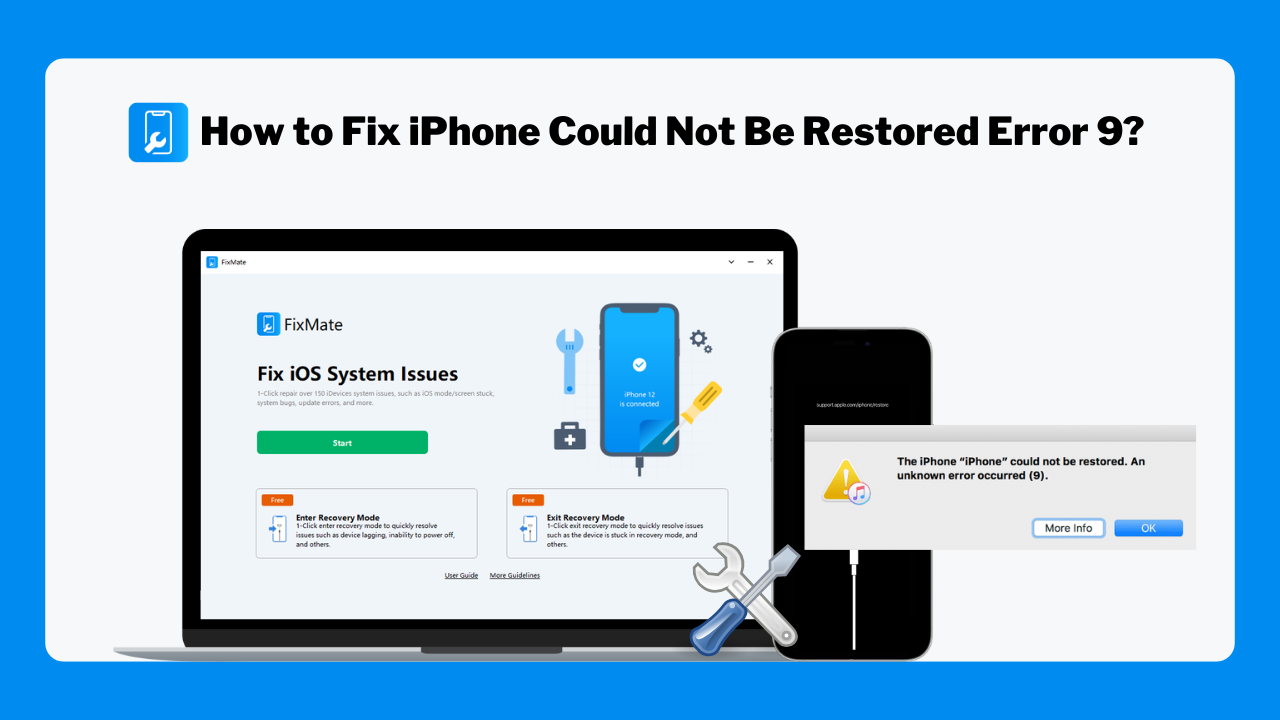
4. Bonus: Fix iPhone System Errors with AimerLab FixMate
If Error 9 is caused by iOS corruption or system-level issues, manually troubleshooting can be time-consuming and may not always succeed. A simpler solution is to use AimerLab FixMate , a professional iOS system repair tool designed to resolve a wide range of iPhone and iPad problems.
Caratteristiche principali di AimerLab FixMate:
- Fixes over 200 iOS and iPadOS system issues
- Resolves boot loops, black screens, frozen screens, and update failures
- Exits and enters Recovery Mode with one click
- Supports the latest iOS versions and Apple devices
How to Fix Error 9 with AimerLab FixMate:
- Scaricate è installate AimerLab FixMate nant'à u vostru Windows.
- Launch the software and connect your iPhone, click “Start” and choose Standard Repair.
- Download the recommended firmware package, then confirm to begin the fixing process.
- Wait for the repair to complete and allow the device to restart.
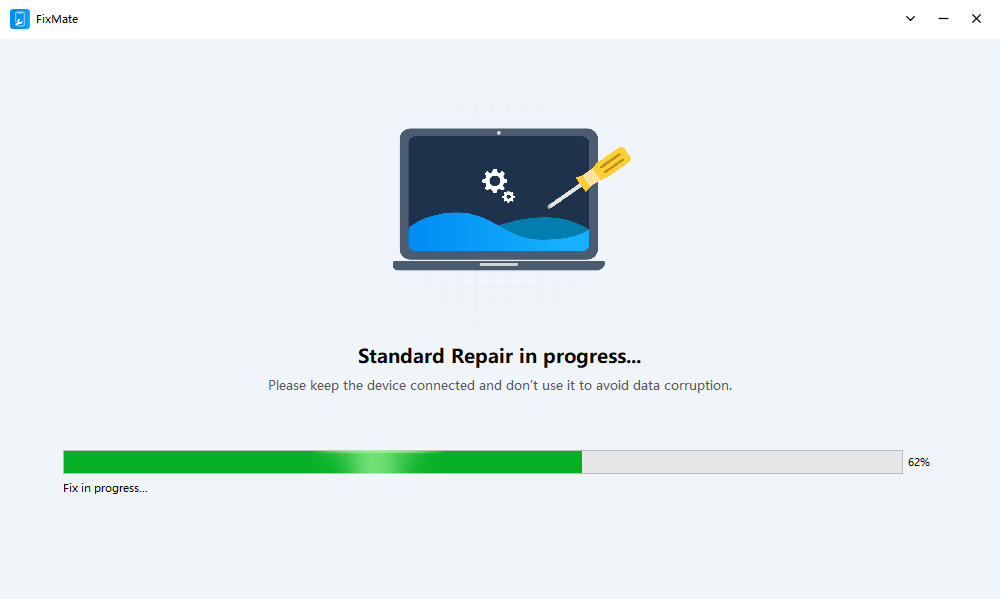
Once finished, many software-related causes of Error 9 can be eliminated without requiring a factory reset or DFU restore.
5. Cunclusioni
The “iPhone could not be restored. An unknown error occurred (9)” message is usually caused by communication failures between the iPhone and computer, software corruption, or occasionally hardware defects. Fortunately, many cases can be resolved by checking the USB connection, updating iTunes or macOS, using Recovery Mode, performing a DFU restore, or trying a different computer.
When Error 9 is caused by deeper iOS system problems, manual methods may not always work. In such cases,
AimerLab FixMate
provides a faster and more reliable solution. With its ability to repair numerous iOS system errors without data loss, FixMate is an excellent choice for users looking to resolve iPhone Error 9 and restore their devices to normal operation with minimal effort.
- iPhone Bluetooth Keeps Disconnecting? Try These Solutions
- How to Fix iPhone 14 Pro Max Screen Green Flickering?
- How to Resolve iPhone Switched to Incompatible eSIM Stuck in Boot Loop?
- How to Resolve “iPhone Not Activated – Contact Your Carrier”?
- How to Resolve iOS 26.2 Can’t Set Up Managed iPhone?
- Perchè a mo torcia ùn funziona micca nantu à u mo iPhone?
- Cumu Spoof Pokemon Go nantu à iPhone?
- Panoramica di Aimerlab MobiGo GPS Location Spoofer
- Cumu cambià u locu in u vostru iPhone?
- Top 5 falsi falsi spoofers di posizione GPS per iOS
- Definizione GPS Location Finder è suggerimentu Spoofer
- Cumu cambià a vostra posizione nantu à Snapchat
- Cumu truvà / Share / Hide Location in i dispositi iOS?